Ipinapakita ang mga post na may etiketa na Computer. Ipakita ang lahat ng mga post

Lunes, Marso 9, 2026

Mabagal magbukas ang App sa PC | Gawan natin ng Paraan

Mabagal ba na magbukas ang App sa PC mo, Gawan natin ng Paraan yan

1. Mabagal na ba magbukas ang App sa PC o Computer mo?


2. Ang gawin nyo lang ay Press Windows Key + R sa iyong Keyboard.


3. Sa Run ay Enter nyo lang ang Mdsched.Exe, Tapos click OK Button.


4. Dito sa Windows Memory Diagnostic ay select nyo ang Restart now and check for problems.


5. At dito naman sa Windows Memory Diagnostics Tool ay antayin nyo lang mag 100%.


6. Para bumilis ang pagbukas ng App sa PC mo.


Maraming dahilan ang pag bagal ng PC o computer natin, May mga video tutorial ako na ginawa na makikita at mapapanood sa aking YouTube Channel. Sa video na ginawa ko na makikita nyo sa baba ay isa lang sa paraan para bumilis ang pag bukas ng App sa ating PC. Dahil sa pag upgrade ng mga gadget ngayon ay talaga namang kapag medyo luma o may katagalan na ang ating PC ay medyo mahihirapan na ito sa mga bagong update na app, kaya naman isa ito sa mga paraan para bumilis ang pag open ng App.


Huwebes, Marso 5, 2026

PC Lag dahil sa Virus, Paano e Remove ang Virus sa Computer

Nag la Lag na PC sa Virus, Paano e Remove ang Virus sa Computer

1. Nag la Lag na PC or Computer mo dahil sa Virus, Paano nga ba e Remove ang Virus sa Computer natin.


2. Type nyo lang ang Windows Key + R sa ating Keyboard.


3. Dito sa Run, Type mrt tapos click OK button.


4. Sa Microsoft malicious Software Removal Tool ay Click Next Button nyo lang.


5. Sa Scan Type ay Click Next Button uli.


6. At Scanning na ang PC natin.


7. Kapag ganito ang Scan Results No Malicious Software was Detected ay OK na ang PC mo.


Gumawa rin ako ng Video Tutorial about dyan sa pag remove ng virus sa pc na makikita at pwedi nyo mapanood sa aking YouTube Channel. Marami akong mga ginawang mga tutorials tungkol sa Computer, mga Tips at Tricks na kaka pulutan ng kaalaman. May pinag sama-sama akung playlist about sa PC Tips and Tricks, na makikita rin sa aking channel.


Huwebes, Hulyo 18, 2019

How to change Time and Date on your Windows 10 Laptop

Now, I'll show you how to change your windows 10 laptop date and time. It's very easy to do it, Sometimes there are applications that need to update the Time and date of our computer. Below is the way, how to do it. Also try watching my video tutorial.

1. Just touch Window Tab and select setting.

2. In Settings click on the time and language.

4. You will find that chane button you click on it. Then you adjust the date and the time of your computer. Then you click the change.

5. Additionally, how to change the time zone of your computer. Just select your time zone and hit it.

I'll also give you some information about my in counter on my laptop. This is the Hibernating Problem. My problem was that it was time, my laptop updated. then suddenly low battery. Then when I ON my laptop I just wrote the Hibernating Problem, then just green screen.

Sabado, Abril 13, 2019

How to solve or fix the Hibernating Problem on your Laptop

How to Fix Hibernating problem with Windows 10 laptop. In just a few clicks. Your Laptop will be back in the past. I just share with you my experience with my ACER laptop.

**How to fix Hibernating on your Laptop**

  • 1. Long Press Power Button in 5 seconds
  • 2. Press the power button again
  • 3. Wait to Windows Loading
  • For other Tutorials just visit my YouTube Playlist. You will find many Tips on computer, which you can share with your family and friends.

    Sabado, Oktubre 27, 2018

    How to Use Google Translate to PC you can Translate Hundred of Language all over the World

    Do you need a translator? Here for you, It's only free that you can translate into different languages.

    Open google translate in your browser.

    Enter text in Translator Box.

    You can select language. See at the top of the box. And listen to your text by pressing the speaker icon.

    Miyerkules, Setyembre 26, 2018

    How to convert text into audio using notepad | Text to speech convertion

    Converting text to audio is amazing. For that reason you will write or just type and you just click the ok button and you'll hear your writings. It's very easy to do With a computer or laptop, it's easy to do it.

  • Open Notepad application, Here are two ways, the first You click the mouse and click New> Text Document and there will be a shortcut to Notepad. And the other is in Windows search, Type your Notepad and the application will appear. You just double-click the application you see and go to Notepad.
  • Copy the code below and paste it into the notepad.
  • CODE HERE...

    Dim message, sapi message=InputBox("Command me anything in text to say?","Ready to Listen") Set sapi=CreateObject("sapi.spvoice") sapi.Speak message
  • And save it to .VBS file by rename here. You will find the file when you save it here .TXT file, change it here .VBS file by rename here.
  • All you have to do is double-click the file that you have renamed and pop up windows will appear. In windows that appear then you just type text and click OK, and listen to the audio.
  • Lunes, Setyembre 3, 2018

    How to make your PC or Laptop Run Faster in easy way in my windows 10

    In this tutorial you'll know how to speed up your PC or Laptop, using my easy way. We will remove junk files, to speed up our gadget.

  • Press on the keyboard the windows key + R and pop up will appear.
  • In pop up windows Type (%temp%) and press OK.
  • Delete all Junk files
  • All delete junk files are go to Recycle Bin, and delete again.
  • Biyernes, Disyembre 22, 2017

    Windows 10 Update - Automatic or notify to schedule restart

    For those using Windows 10 like me. Because the application changes the version. We need to update our windows. After updating the new version, please wait for the new version. This is a problem, even if we update it. It still needs updating. So I'm researching and I teach you how to do it, for not being able to update itself.

    We think no problem with us. but there is, especially for wifi users to get internet. The user's data is lost when windows is auto-updated. There is no problem with unli data, but limited data is delicate. Because data is slowly depressing when windows is up to date. Please subscribe to my channel: My YouTube Channel

    So as I've limited the data I've searched for ways to prevent or not auto-update windows.

    Stop Windows Update

    Lunes, Mayo 8, 2017

    How to get Contact us and put in your Blog Page "Blogger"

    If you have a Blog or Website, you also have a contact us to connect reader to the admin of Blog or Website. In this tutorial i would like to share a simple step to create a contact to the admin of site;

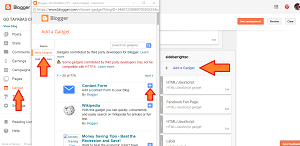
  • To test your Blog if they have connect to your email. First login to your Blogger > dashboard > layout > Add a Gadget > and in the pop up windows > More Gadgets > click + to add a gadget to your Blog.
  • After finish the step above try to send a message to your contact us form. Go to your Blog and go to your contact us where you put them. Go to your Email and check the inbox if the message are in your inbox. After proof if the message are in inbox, delete the Gadget. By going to Blogger dashboard > Layout > Edit the Gadget and the pop up windows show, delete or remove the Gadget.
  • Here the procedure to create a Contact us in your Page.

  • Go to Dashboard > Pages > New Page and create a Page click the HTML beside Compose and put the code here, after finish click Publish. How to put Page to Gadget.
  • Here the CODE and Procedure to get Blog ID.

  • The Blog ID is located on search Bar we have 19 Digit number. Replace the Blog ID in CODE below.
  • <script>
    var blogId = 'BLOG ID';//this number should be mandatorily edited.
    //The below message 5 Strings can also be edited
    var contactFormMessageSendingMsg ='Sending...';
    var contactFormMessageSentMsg = 'Your message has been sent.';
    var contactFormMessageNotSentMsg = 'Message could not be sent. Please try again later.';
    var contactFormEmptyMessageMsg ='Message field cannot be empty.';
    var contactFormInvalidEmailMsg = 'A valid email is required.'
    
    var widgetLoaded=false;
    function sendEmailMsg() {
    if(widgetLoaded== false) {
    _WidgetManager._RegisterWidget('_ContactFormView', new _WidgetInfo('ContactForm1', 'sidebar', null, document.getElementById('ContactForm1'), {'contactFormMessageSendingMsg': contactFormMessageSendingMsg , 'contactFormMessageSentMsg': contactFormMessageSentMsg , 'contactFormMessageNotSentMsg': contactFormMessageNotSentMsg , 'contactFormInvalidEmailMsg': contactFormInvalidEmailMsg , 'contactFormEmptyMessageMsg': contactFormEmptyMessageMsg , 'title': 'Contact Form', 'blogId': blogId, 'contactFormNameMsg': 'Name', 'contactFormEmailMsg': 'Email', 'contactFormMessageMsg': 'Message', 'contactFormSendMsg': 'Send', 'submitUrl': 'https://www.blogger.com/contact-form.do'}, 'displayModeFull'));
    widgetLoaded=true;
    document.getElementById('ContactForm1_contact-form-submit').click();
    }
    return true;
    }
    </script>
    <form name='contact-form'>
    <div>Your Name : </div>
    <input class='contact-form-name' id='ContactForm1_contact-form-name' name='name' size='30' type='text' value=''/>
    <div>Your Email: <em>(required)</em></div>
    <input class='contact-form-email' id='ContactForm1_contact-form-email' name='email' size='30' type='text' value=''/>
    <div>Your Message: <em>(required)</em></div>
    <textarea class='contact-form-email-message' id='ContactForm1_contact-form-email-message' name='email-message' rows='5'></textarea>
    <p></p>
    <input class='contact-form-button contact-form-button-submit' id='ContactForm1_contact-form-submit' type='button' value='Send' onclick="sendEmailMsg()"/>
    <div style='text-align: center; max-width: 450px; width: 100%'>
    <p class='contact-form-error-message' id='ContactForm1_contact-form-error-message'></p>
    <p class='contact-form-success-message' id='ContactForm1_contact-form-success-message'></p>
    </div>
    </form>
    

    Now we have a Contact form, try it if working?

    Biyernes, Mayo 5, 2017

    How to erase your own post on Facebook

    In this tutorial i will show you how to erase or remove post on Facebook. If you don't know how to remove your post in Facebook, Here the simple procedure to erase the post.

  • If you have a post and you want to delete.The first thing you do is click the profile name on the top of screen. But if you don't login to your account, Login first by using your Email or number and password. On the profile page find the post you want to delete, scroll down the page and find it. In the post put the arrow mouse on V ship located on the right of screen post and click.
  • On pop up window choose find Delete and click, to erase your post permanently. Another pop up windows upper, said "This post will be deleted and you won't be able to find it anymore. You can also edit this post, if you just want to change something." and click either edit post or delete post.
  • Linggo, Abril 16, 2017

    How to create a Boom Boom effect using Photoshop

    In this tutorial I show you how to create a Boom effect animation using Photoshop. You can use the animation to create a animation image like a sound system with Boom Boom effect.

    I show you the procedure to create a animation

  • First thing you have is a image of a speaker with transparent background and the file of image is PNG.
  • In the top menu click windows > Timeline and create frame animation.
  • Put the arrow on layer 1 and press Ctrl+J, to create a new layer. In the layer 1 copy change the opacity in 100% to 30%. And slightly adjust the image by click in the top menu Edit > Transform > scale and adjust the image. Click "Apply the Transformation".
  • Put the arrow again in layer 1 copy and press Ctrl+J, to create a new layer. In layer 1 copy 2, slightly adjust the image by click in the top menu Edit > Transform > scale and adjust the image. Click "Apply the Transformation". Click the layer 0 to change the background color.
  • Click the indicates layer visibility of layer 1 copy and layer 1 copy 2 and click the duplicates selected frames, to create a new frame.
  • Click again the indicates layer visibility of layer 1 copy and click the duplicates selected frames, to create a new frame.
  • Click again the layer 1 copy to hide the indicates layer visibility and click the layer 1 copy 2, and click the duplicates selected frames, to create a frame number 4. Adjust frame 1 to 0.5 sec. and the frame 2, 3, and 4 to 0.1 sec. and play to see what happend in animation. All done...
  • Watch the video below for video tutorial, thanks and Subscribe.

    Martes, Abril 11, 2017

    How to get RSS Feed URL on your BLOG via Blogger

    In this tutorials i will show you how to get RSS Feed on your Blog via Blogger. Sometimes we need to get RSS Feed URL of your Blog to share your content to other site automatically.

    Blogger Blog is hosted by GOOGLE, indicates the (blogname.blogspot.com) you'll see on new create Blog Site on Blogger. But if you have to buy a domain name like .com, .net, etc.

    You'll see like this (blogname.com) on RSS Feed URL. Below there are different type of RSS Feed URL.

    RSS Feed URL-Full Site

  • Atom 1.0: http://blogname.blogspot.com/feeds/posts/default
  • RSS 2.0: http://blogname.blogspot.com/feeds/posts/default?alt=rss

    RSS Feed URL-Comments-only

  • Atom 1.0: http://blogname.blogspot.com/feeds/comments/default
  • RSS 2.0: http://blogname.blogspot.com/feeds/comments/default?alt=rss

    RSS Feed URL-Label-specific Site

  • Atom 1.0: http://blogname.blogspot.com/feeds/comments/default/-/labelname
  • RSS 2.0: http://blogname.blogspot.com/feeds/comments/default?alt=rss/-/labelname

    RSS Feed URL-Individual Post Comment

  • Atom 1.0: http://blogname.blogspot.com/feeds/postId/comments/default
  • RSS 2.0: http://blogname.blogspot.com/feeds/postId/comments/default?alt=rss
  • Biyernes, Marso 24, 2017

    How to get Shareit in your Divices

    The easy way to share your files is to use the shareit. This app is use all over the world and shareit is 200 times faster than bluetooth,

    Huwebes, Marso 16, 2017

    How to get modern version of Adobe Flash for video editing tools require for YouTube

    If you a YouTuber and you want to edit your Video But can't not edit and view the video , Because your Adobe Flash is out of date. Here the Procedure to update your Adobe Flash Player.

    Martes, Marso 7, 2017

    How to upload Photo in Facebook using mobile phone

    This Tutorials is for people who use a mobile phone. I show you how to Upload Image in social media like Facebook using Mobile Phone. You can watch Video tutorial "Mobile Phone Upload Photo on Facebook. For more Tutorials Kindly Share , like and Subscribe to my channel.

  • On Mobile Menu Click the Facebook Icon.
  • In Home Page of Facebook Click Photo. If you are not login. Before this procedure login first.
  • And click the image you want to upload.
  • Edit your selected photo and you can say something about this. To add Photo you want to upload you only have to do is click the Add Photos. After edit the photo or add photo click the POST.
  • After click the POST ready to upload your picture and all are done now you can upload a photo on your mobile phone.
  • Richard N. Cabile

    All about myself. Everything I know I will teach you.

    Read more..

    My Motto in Life: Time is Gold.